 Skip to content
Bike SALE now on. Check out the Shop for more details
eBike Conversion Kits
Simple pricing options
Choose your electric bike conversion kit based on the terrain your riding on. Need some advice? Where here to help, just give us a call were happy to help talk you through options for your conversion.
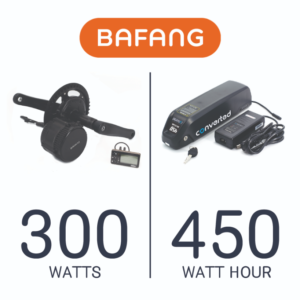
Starter Kit
$1800
plus install
Perfect entry level kit to turn your standard bike to electric assist.
Features a 300 watt motor + 10.5Ahr battery.
Get 30% Off
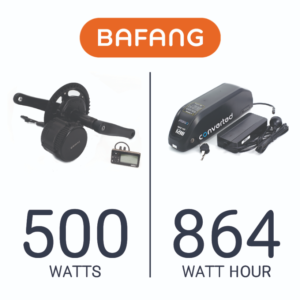
Pro Kit
$2650
Plus Install
Ideal for touring and mountain biking.
Features a 500 watt motor + 24Ahr battery.
Touring Kit
$2450
Plus Install
Designed for touring on road and bike trail.
Features a 300 watt motor + 24Ahr battery.
Revamp Your Ride: Uncover the Ultimate Guide to E-Bike Conversion Kits
Looking to give your bicycle an electrifying upgrade? Look no further! In this ultimate guide to e-bike conversion kits, we’ll walk you through everything you need to know to revamp your ride and turn it into a powerful and eco-friendly electric bike.
Whether you’re a commuter looking for a more efficient way to get around town or an adventure seeker craving an extra boost on off-road trails, e-bike conversion kits offer a cost-effective solution. From the basics of how conversion kits work to the different types available on the market, we’ve got you covered.
We’ll also explore the key components of a conversion kit, including the motor, battery, controller, and throttle, and provide expert tips to help you choose the right options for your specific needs. Plus, we’ll delve into the installation process, highlighting the tools and skills required to successfully transform your regular bike into a powerful e-bike.
Get ready to unlock the world of e-bike conversion kits and revolutionize your cycling experience. Let’s dive in!
What are e-bike conversion kits
E-bike conversion kits are aftermarket kits designed to transform your regular bicycle into an electric bike. These kits consist of several components, including a motor, battery, controller, and throttle, that work together to provide electric assistance while you pedal. With an e-bike conversion kit, you can enjoy the benefits of an electric bike without having to invest in a brand new one.
E-bike conversion kits come in various types and configurations, offering different levels of power and functionality. From rear wheel conversion kits to mid-drive conversion kits, there’s an option available for every type of bicycle and rider preference. Whether you have a mountain bike, a road bike, or a folding bike, there’s a conversion kit that can transform your ride into an electric powerhouse.
Advantages of using e-bike conversion kits
There are several advantages to using e-bike conversion kits. Firstly, they offer a cost-effective solution for those who want to experience the benefits of an electric bike without breaking the bank. Instead of purchasing a brand new e-bike, you can simply upgrade your existing bicycle with a conversion kit, saving you money in the process.
Secondly, e-bike conversion kits allow you to customize your ride according to your specific needs and preferences. You have the freedom to choose the type of motor, battery capacity, and control system that best suits your riding style. Whether you’re looking for a high-powered motor for off-road adventures or a compact and lightweight system for commuting, the flexibility of conversion kits allows you to tailor your e-bike to your liking.
Another advantage of using e-bike conversion kits is their eco-friendliness. By converting your regular bicycle into an electric bike, you’re reducing your carbon footprint and contributing to a greener environment. E-bikes are a sustainable mode of transportation that can help reduce traffic congestion and air pollution in urban areas. With a conversion kit, you can join the e-bike revolution and make a positive impact on the planet.
Types of e-bike conversion kits
There are several types of e-bike conversion kits available on the market, each offering different features and benefits. The most common types include:
- Rear wheel conversion kits: These kits replace the rear wheel of your bicycle with a motorized wheel that provides electric assistance. Rear wheel conversion kits are relatively easy to install and offer good traction and stability. They are suitable for most types of bicycles and provide a smooth and balanced riding experience.
- Front wheel conversion kits: Similar to rear wheel conversion kits, front wheel conversion kits replace the front wheel of your bicycle with a motorized wheel. These kits are generally easier to install compared to rear wheel kits but may affect the balance of your bike, especially at higher speeds. Front wheel conversion kits are a popular choice for commuters looking for a simple and efficient way to convert their bikes into e-bikes.
- Mid-drive conversion kits: Mid-drive conversion kits are installed in the bottom bracket area of your bike, replacing the existing crankset. These kits provide a more natural riding experience as the motor assists the pedals directly. Mid-drive conversion kits are known for their efficiency and torque, making them ideal for off-road and hilly terrains. However, they can be more complex to install and may require professional assistance.
- All-in-one conversion kits: All-in-one conversion kits combine the motor, battery, controller, and other components into a single unit that can be easily installed on your bicycle. These kits are compact and lightweight, making them a popular choice for those who want a streamlined and minimalist e-bike conversion. However, the power and range of all-in-one conversion kits may be limited compared to separate component kits.
Factors to consider before choosing an e-bike conversion kit
Before diving into the world of e-bike conversion kits, there are several factors you should consider to ensure you choose the right kit for your needs. These factors include:
- Compatibility: It’s important to ensure that the conversion kit you choose is compatible with your bicycle. Consider factors such as wheel size, frame design, and brake system compatibility. Some conversion kits may only work with certain types of bikes, so be sure to check the specifications before making a purchase.
- Power and range: Determine the level of power and range you require from your e-bike. If you’ll be tackling steep hills or off-road trails, you may need a more powerful motor and a higher capacity battery. On the other hand, if you’ll primarily be using your e-bike for short commutes, a less powerful kit with a smaller battery may suffice.
- Battery type and capacity: Consider the type of battery used in the conversion kit and its capacity. Lithium-ion batteries are the most common and offer a good balance between weight, capacity, and lifespan. Higher capacity batteries will provide a longer range but may also be heavier. Choose a battery that matches your riding needs and preferences.
- Control system: The control system of the conversion kit determines how you interact with the motor and adjust the level of assistance. Some kits offer simple throttle control, while others provide pedal-assist modes that automatically adjust the power based on your pedaling input. Consider which control system suits your riding style and preferences.
- Budget: Set a budget for your e-bike conversion project and stick to it. Conversion kits can range in price, depending on the brand, features, and quality. It’s important to find a balance between affordability and quality to ensure you get the best value for your money.
By considering these factors, you can narrow down your options and choose an e-bike conversion kit that best suits your needs and preferences.
Step-by-step guide to installing an e-bike conversion kit
Once you’ve chosen the perfect e-bike conversion kit for your bicycle, it’s time to install it and bring your electric dream to life. While the installation process may vary depending on the specific kit you choose, here is a general step-by-step guide to help you get started:
- Gather the tools: Before you begin, make sure you have all the necessary tools for the installation. This may include wrenches, screwdrivers, cable cutters, and zip ties. Refer to the installation manual provided with your conversion kit for a complete list of required tools.
- Remove the existing wheel: Start by removing the existing wheel from your bicycle. Depending on the type of conversion kit, you may need to remove the front or rear wheel. Use the appropriate tools to loosen the nuts or quick-release skewer and carefully remove the wheel.
- Install the motorized wheel: If you’re using a rear or front wheel conversion kit, replace the removed wheel with the motorized wheel from the conversion kit. Align the axle with the dropouts on your bike frame and tighten the nuts or quick-release skewer to secure the wheel in place. Make sure the motor cable is properly routed and does not interfere with any moving parts.
- Connect the motor: Follow the instructions provided with your conversion kit to connect the motor to the controller. This may involve connecting wires and ensuring proper insulation and protection. Take your time to carefully route the cables and secure them with zip ties to prevent them from getting tangled or damaged.
- Install the battery: Determine the best location for the battery on your bike. Some conversion kits provide a mounting bracket or bag for the battery, while others may require you to find a suitable spot on your own. Ensure the battery is securely mounted and does not interfere with your pedaling or steering.
- Connect the battery: Connect the battery to the controller using the provided cables. Take note of the polarity and make sure the connections are secure and insulated. Some kits may have additional connectors for charging or other accessories, so refer to the instructions to ensure proper connection.
- Install the controller and throttle: Mount the controller and throttle on your handlebars or in a convenient location. Make sure they are securely fastened and easily accessible while riding. Connect the controller to the motor and throttle using the provided cables, following the instructions provided by the conversion kit manufacturer.
- Test and adjust: Once all the components are installed, it’s time to test your new e-bike. Turn on the battery and check that the motor, throttle, and pedal-assist modes are functioning properly. Take a short test ride to ensure everything is working as expected. If necessary, adjust the settings or make minor tweaks to optimize your riding experience.
Remember, if you’re not confident in your mechanical skills, it’s always a good idea to seek professional assistance for the installation. This will ensure that everything is properly installed and reduce the risk of any issues or safety concerns.
Maintenance and troubleshooting tips for e-bike conversion kits
To keep your e-bike conversion kit in top shape and ensure a smooth riding experience, regular maintenance is essential. Here are some maintenance and troubleshooting tips to help you keep your e-bike running smoothly:
- Keep the battery charged: Regularly charge your e-bike battery to maintain its performance and maximize its lifespan. Follow the manufacturer’s instructions for charging cycles and storage recommendations. Avoid completely draining the battery or leaving it discharged for extended periods.
- Clean and inspect the motor: Periodically clean the motor and inspect it for any signs of damage or wear. Remove any debris or dirt that may have accumulated around the motor to prevent overheating. Check the connections and wiring to ensure they are secure and properly insulated.
- Check the brakes: Ensure that your brakes are in good working condition and provide sufficient stopping power. E-bikes can be heavier than regular bicycles due to the additional components, so it’s important to have reliable and properly adjusted brakes. Adjust the brake pads and cables if necessary and replace any worn-out components.
- Lubricate the chain and drivetrain: Apply lubricant to the chain and other moving parts of the drivetrain to reduce friction and ensure smooth shifting. Clean the chain regularly to remove dirt and excess lubricant. A well-maintained drivetrain will improve the efficiency and longevity of your e-bike.
- Check tire pressure: Keep an eye on the tire pressure and maintain it within the recommended range. Proper tire inflation will improve the handling and efficiency of your e-bike. Inspect the tires for any signs of wear or damage and replace them if necessary.
- Troubleshooting common issues: If you encounter any issues with your e-bike conversion kit, such as a loss of power or error codes, consult the troubleshooting section of the manufacturer’s manual. Follow the recommended steps to diagnose and resolve the problem. If the issue persists, contact the manufacturer or seek professional assistance for further troubleshooting.
By following these maintenance and troubleshooting tips, you can ensure that your e-bike conversion kit remains in optimal condition and provides reliable performance for years to come.
Popular e-bike conversion kit brands and models
When it comes to choosing an e-bike conversion kit, there are several reputable brands and models to consider. Here are some popular options that have gained recognition for their quality and performance:
- Bafang: Bafang is a well-known brand in the e-bike industry, offering a wide range of conversion kits that cater to different riding styles and preferences. Their mid-drive motor kits are highly regarded for their power and efficiency, making them a popular choice among off-road enthusiasts.
- Tongsheng: Tongsheng is another reputable brand that specializes in mid-drive conversion kits. Their products are known for their smooth power delivery and quiet operation. Tongsheng conversion kits are often praised for their affordability and reliability.
- Swytch: Swytch offers all-in-one conversion kits that are compact, lightweight, and easy to install. Their kits are designed to fit most bicycles and provide a seamless electric assist experience. Swytch conversion kits are known for their versatility and user-friendly design.
- Voilamart: Voilamart offers a range of rear wheel and front wheel conversion kits that provide excellent value for money. Their kits are known for their durability and performance, making them a popular choice among budget-conscious riders.
- E-rad: E-rad specializes in high-performance e-bike conversion kits that cater to the needs of avid cyclists and adventurers. Their mid-drive kits offer exceptional power and torque, allowing riders to conquer challenging terrains with ease.
When choosing a conversion kit, it’s important to research and read reviews to ensure that the brand and model you choose meet your specific requirements and expectations. Consider factors such as power, battery capacity, reliability, and customer support when making your decision.
Comparison of e-bike conversion kits vs. pre-built e-bikes
While e-bike conversion kits offer a cost-effective solution for upgrading your regular bicycle, it’s worth considering the option of purchasing a pre-built e-bike. Here’s a comparison of the two options to help you make an informed decision:
- Cost: E-bike conversion kits are generally more affordable compared to pre-built e-bikes. By converting your existing bicycle, you can save a significant amount of money. However, it’s important to consider the overall cost, including the price of the kit, installation, and any additional accessories or modifications required.
- Customization: E-bike conversion kits allow for greater customization compared to pre-built e-bikes. You have the freedom to choose the components that best suit your needs and preferences. With a pre-built e-bike, you’re limited to the specifications and features offered by the manufacturer.
- Quality and warranty: Pre-built e-bikes are typically manufactured by reputable brands and undergo rigorous testing to ensure quality and reliability. They often come with warranties that cover the frame, motor, and other components. Conversion kits vary in terms of quality and warranty, so it’s important to choose a reputable brand that offers reliable support and after-sales service.
- Installation and expertise: Converting your bicycle into an e-bike requires some level of technical expertise and mechanical skills. While installation can be done by DIY enthusiasts, seeking professional assistance may be necessary for those who are less mechanically inclined. Pre-built e-bikes, on the other hand, are ready to ride out of the box and require minimal assembly.
- Availability and variety: Pre-built e-bikes are readily available from bike shops and online retailers, offering a wide range of models and styles to choose from. Conversion kits may have limited availability and may not be compatible
